
A few weeks ago, we covered the design process in four phases. The four phases of design include the Inventory Phase, the Inspiration Phase, the Design Phase, and the Construction Phase. Design involves going back and forth between these phases, but you must start at the beginning. The first step and arguably one of the most important steps in any project is the initial planning. We call this the Inventory Phase – it is the time when you take a step back and see what you have and what you need before jumping in. There are two steps in this phase – the first step is to Take an Inventory. The second step is to Set a Budget.
Take an Inventory
One of the first steps in any project is to take an inventory of what you have so you can determine what you need to do.

Take Photos
With a home renovation, your first step is to go into the home and take photos of everything. You want to know what you are working with, and photos give you a permanent record of what you have. The photos do not need to be amazing photos that showcase your space. These are photos of what you need to remember – like the vague location of a sink, the spot that seems to have water damage, the overhead lighting that needs to be overhauled, the current color of the walls or size of the trim or shape of the tiles. Get in and take photos of every single wall, the flooring in each room, the ceiling in each room, and any that need some TLC. We love using phones for photos since you have access to them when you are out looking for products. These photos will help you create or choose the right ADU Plans if you are planning to build a home addition in your property.

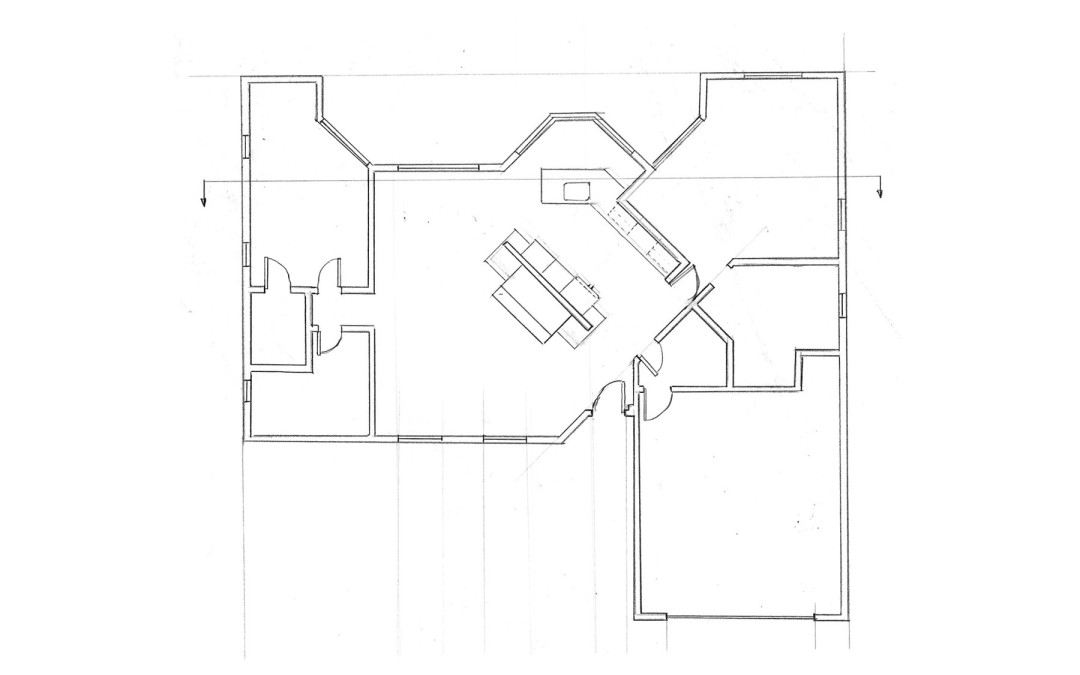
Create a Floor Plan
The next step in the inventory phase is to take precise measurements of everything and create a floor plan. The floor plan is essential for any renovation project because it gives you the starting point for everything that you want to do. You need to know where all the walls are located so you can determine if your plan will work within those walls or if you need to remove some. You need to know the location of all drain pipes and electrical appliances as well so you can determine if you will be keeping those in their locations or moving them. Moving plumbing in a wood frame house over a crawl space is a relatively simple matter. Moving plumbing in your average concrete block Florida ranch house on a concrete pad is relatively difficult, time consuming, messy (really, really messy) and expensive (if you go the non-DIY route). You need to know the locations of each of these things to determine how they fit together.
If you want more information on Architectural Drawings, go to our Post: Introduction to Architectural Drawing

Creating an initial floor plan may seem daunting, but it is not complicated. I recommend investing in a project binder, which consists of a clear three-ring binder with a pack of 8½ x 11-inch sheet protectors for magazine and catalog cutouts, printouts, and drawings, a pack of graph paper, a notebook (the Moleskin 3-Pack is our favorite), a pencil and/or pen, and a straight-edge. You will need a sheet of graph paper to create your initial floor plan. The goal is to keep the house on sheet of graph paper, but that may be difficult. We generally make each square equal to 6-inches or a foot, depending on the size of your structure. Measure each wall and draw the wall to scale (to the best of your ability) and label it with the length (get detailed and use 16ths of an inch). Proceed with each wall until you have completed the room. Measure the windows and their locations, width, and height as well as their height from the ground. Measure door openings and locations and wall thicknesses. You will be doing this for each room. In the kitchen and bathrooms, you want to get additional locations on the sinks, tubs, showers, and toilets. Get a location on the drain lines if you can. You want this to be as detailed as possible, but you can always go back and get more measurements if you forget something, in our case, we decided to work with professionals like the ones at https://www.granitetransformations.com/location/granite-transformations-of-st-louis/.
The final step is to put together an initial floor plan that you can modify with your new design. We like to use AutoCAD because we have access to it, but http://www.homestyler.com/ is an excellent free option. Another option is to redraw the final plans on graph paper and keep it in your clear 8½ x 11 sheet protectors where you can draw over it with dry erase markers. The point here is to have something to work with when you are considering your design.

Consider New Ideas
After you have taken photos of the house and made a floor plan, you need to consider what changes you want to make before you move on to setting a budget. Do you want a more open floor plan? Do you need an additional room? Does your kitchen need an overhaul or would a new coat of paint fit the bill? Are there areas of the house that have damage that need to be repaired? Do any parts of the house need to be brought up to code? Consider modifications in terms of NEEDS and WANTS. Write down a list of what you NEED TO MODIFY and a what you WANT TO MODIFY. Now rearrange the list based on your priorities. Now that you have your list of modifications, you are ready to move on to setting a budget.
Set a Budget
One of the most important aspects of any project is determining how much it is going to cost you in both TIME and MONEY. Few projects are free, and generally, the more money you wish to save, the more time you will have to invest. We did our house ourselves and it took a really long time. Granted, we estimate we would have paid 3 to 4 times more money by having a contractor do the work, but what we saved in money we definitely lost in time. Some projects will take both a lot of money and a lot of time and other projects may be low in both. But it is important that you take time to think through how much you have to spend and how much time you have to invest. Then take those numbers and multiple them by 50% and you might get near the actual investment.

Budget Time
Time is a huge investment in any DIY project and you should consider time as a limited asset that you have to spend just like money. Do you want to do this project yourself? You need to consider how much time you will be losing to the project. Are you losing free time to work on this project or will you be giving up paid time at work? If you are giving up paid work time for a DIY project, you need to calculate the amount of money you will be giving up and compare that to the amount you would pay a contractor to do the work for you. You may find that you are better off making money in your free time and paying someone else to do your work. However, if you are a huge fan of DIY projects and you find a renovation FUN, then by all means proceed ahead (we really enjoyed our home renovation but we are also really glad it is mostly done). Our biggest time constraint was that Matt was in school full time and working full time during our renovation. The entire renovation seems somewhat miraculous now that we have completed it. We found that we had a few weekends and evenings free and no ability to do extra paid work on those weekends because of Matt’s school schedule, so we set aside our time for our renovation.

Budget Money
The amount of money (and time) a renovation will cost you depends on so many factors that it is often difficult to determine how much you will need to spend ahead of the project. Instead, it may be better to determine how much money you have available to spend and then limit the project accordingly. Consider the quality of construction and the extent of construction so you do not “out build” the neighborhood. You do not want to put so much money and time into the project that you will have a house that is worth too much for the neighborhood when you are finished. On the other hand, if you have plans to stay in the house for a long time, you should do as high quality a job as possible the first time through. Nothing costs more than doing a renovation twice. When we moved in, our entire house needed a renovation. We have the smallest house in our neighborhood, which consists of houses ranging from the mid-200s to over a million dollars, so we had no fear of out-building the neighborhood. We could do a very high-quality construction job and easily stay within the home values of those around us.
Our budget then began with what we had leftover when we sold our first house and paid off all of our debt. We took that budget and started looking into what we needed to renovation and how much we could do at one time. We needed all new flooring and a new kitchen, but the extent of the kitchen renovation would be dependent on the budget. We also needed to get new sinks into the bathrooms, but those became an afterthought as we have plans to fully renovate the bathrooms in the future (You know – when we have time (haha), money, and a little sanity). Once we had our budget set, we were able to look into what we needed to do and how much it would cost, and our budget dictated what we could and could not do.
We will be working on a downloadable budget spreadsheet for anyone ready to embark on a project. In the mean time, if you have specific budget related questions, feel free to contact me and I will be happy to answer your questions.
Recent Comments