
DIY Yard Dice are easy to make and a fun project to work on. They can be used for hours of family fun and make a wonderful, thoughtful gift. This tutorial is the start of a series on wood working. If you have done little to no wood working, I highly recommend starting with this project and proceeding through the next in the series to get to know the different aspects of wood. You will learn about the hardness and grain of wood and how those two things can make a huge difference in what tools you use when you are working with it. The tools listed below are power tools, but this project can be completed without any power tools at all. Supplies listed are what we used and we will list alternatives as well.
Materials
- 4x4-inch Wood Post (We chose Cedar)
- Large Canvas Bag (optional)
- Fabric Paint (optional)
- Letter Stencils (optional)
- 8½ x 11 Kraft Paper (optional)
Tools
- Belt Sander
- Random Orbital Sander
- Finishing Sand Paper (220 Grit)
- Miter Saw
- Wood Burning Tool (we use the Versa Tool)
Safety Equipment
- Mechanics Gloves
- Eye Protection
- Ear Protection (optional)


Before you begin any wood working project, make sure you have proper safety equipment. Eye protection will prevent you from getting dust in your eyes and gloves will keep you from getting a splinter as well as making the wood and the equipment easier to grip. I prefer using ear protection when using power tools as they can be rather loud.
This project requires a 4x4-inch wooden post to cut into dice shapes. We chose Cedar for its beauty and longevity. Any wood will do, and options vary by location. Carefully pick out your wood avoiding, too many dents. Once you pick out your wood, note its qualities. Cedar is soft and tends to be sold rough-hewn. As you can see in these photos, the wood is rough and needs to be sanded. Other wood posts may be smoother, but will require some sanding. You can also see in this post the difference between one sanded side and the original rough side. Cedar is soft and doesn’t need extensive sanding to get a smooth surface.


Before you begin sanding, you will need to set the wood up on a stable base. You can place it on the back tailgate of a truck or across two sturdy sawhorses. We prefer these Husky Workhorse Workbenches. We have found that it is much easier to sand the wood before cutting it. If you don’t have access to a miter saw, you can have the wood precut into cubes at Home Depot. This is not preferable as they will need to be sanded after being cut, and that will be time very time consuming and result in cubes that will not be even in size or shape.
There are many different ways to sand wood. With a long, straight post, the fastest way to get it smooth will be a Belt Sander. We borrowed one from my family. If you don’t have access to a belt sander, the next best option is a random orbital sander (you can find a nice one in our gift guide). The random orbital sander will take longer than the belt sander. You could also use a mouse sander (also in our gift guide) or, if you are prepared to be working on this project all night, feel free to sand by hand. If you go with the belt sander, carefully choose your sandpaper grit. The lower the number on the grit, the rougher the sandpaper is. Cedar is so soft that you will likely need fine or very fine sandpaper. We used 180 grit and it smoothed the wood quickly and easily. When we tried lower grit paper, it made the wood rougher. once you have smoothed each side with the belt sander, you can go back over the wood with an orbital sander. We used 220 grit paper for the second pass.


A belt sander produces a lot of dust in a short time, so be prepared to brush the dust off as you go. We used a drafting brush, but you can use any method that quickly removes the dust. Air compressors and leaf blowers are other options.
The next step is to cut the wood into cubes. If you want the yard dice set to work for Yahtzee, you will need 5 cubes for each set. You make cubes first by measuring the newly sanded wood post width. It can be helpful to use a Combination Square with a slide. You want the height of each cube to match the width. Take a measurement across the width, then mark the same measurement along the height. If you are using a combination square, measure the width and screw the slide down. Then you can use the same length with all your measurements. Make your mark legible. You will be cutting each piece and then measuring again.


Once you have made your first mark, you will use the miter saw to cut along the mark. Be sure to cut along the outside of the mark as the blade on the miter saw has width and will shorten the entire length of the cube if you cut along the center. Once you cut one cube, measure from the bottom and cut again. The next steps are to measure, then cut, then measure, then cut, etc. until you have the number of cubes you want or your entire post has been cut into cubes.
The final step is to sand the edges and burn the dots onto each side to make dice. The goal of sanding the edges is to prevent anyone from getting a splinter. We used 220 grit sandpaper and got any areas that were rough. Sand each side down and pile all of your cubes in sets.


Once the edges are smooth, you can burn the dots. You can use any wood burning tool, but we found that the Versa Tool had a large flat circular head included, which is convenient. Screw the large circle into the tool base (before you heat it up). Use pliers to make sure it is in tight. Plug the tool in and turn the dial on to the hottest setting. Once the tool is hot, burn your dots using a store bought die for reference. We’ve done everything from marking where each dot carefully to eyeballing it and eyeballing works just as well. If you are creating a lot of dice, it is best to start with the six-dotted side and burn those six dots onto one side of all the dice first. As you burn, you will note that it takes a few seconds to make the mark and some sides burn more quickly than others. You will get the hang of burning as you go along. Once one side is completed on all the dice, flip the reference die in one direction and flip all the burned dice in the same direction. Burn the same number of dots on the next side, making sure to match it exactly. Do this until all sides have been dotted.
*if you do not wish to purchase a versa tool, you might be able to use a soldering iron or just a plain sharpie marker.
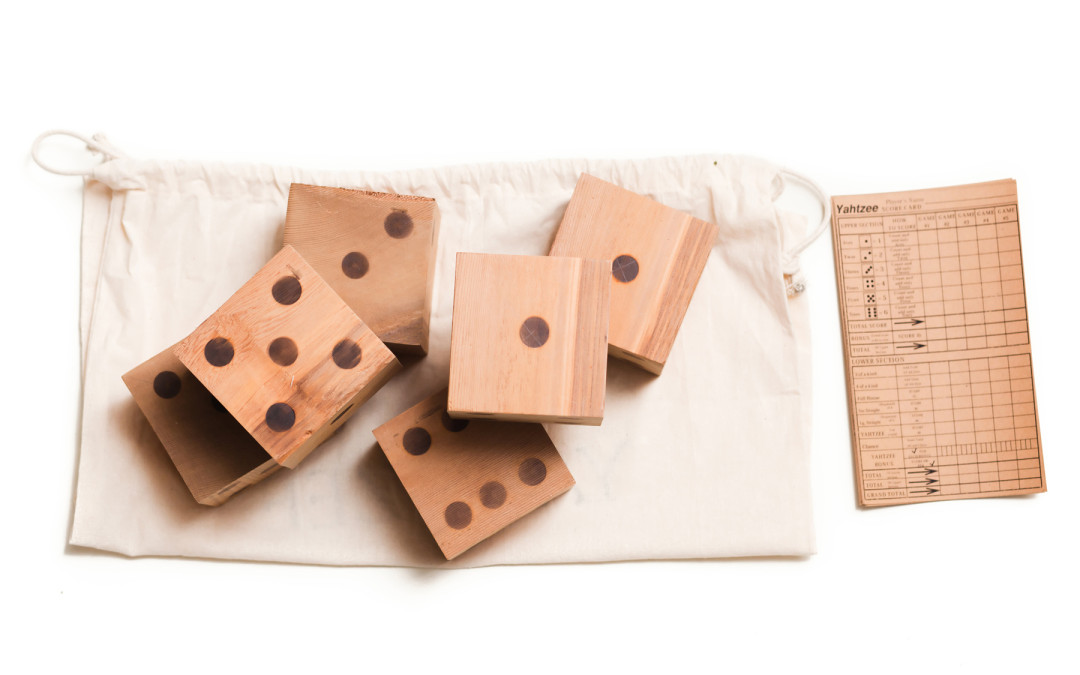
The final step is to create a container for your dice. We like using a canvas drawstring bag. You can personalize the bag using stencils and fabric ink. If you want to use your dice for Yahtzee, you can download yahtzee score sheets online and print them on kraft paper to include with the dice. Now you are ready for your next barbecue!

Recent Comments